DIY Hummingbird Feeder Glass Bottle: A Guide!
A DIY hummingbird feeder glass bottle is a homemade feeder for hummingbirds made using a glass bottle.
A DIY hummingbird feeder glass bottle is an easy and cost-effective project to create a feeding station for hummingbirds in your yard or garden, using a glass bottle as the base.
Making a DIY hummingbird feeder glass bottle can be a fun and rewarding project, allowing you to observe hummingbirds up close while providing them with a source of nourishment.
By repurposing a glass bottle, you create an eco-friendly feeder that is easy to clean and maintain, ensuring a safe environment for these fascinating birds.
7 Steps of DIY Hummingbird Feeder Glass Bottle
| Step | Materials | Instructions |
|---|---|---|
| 1 | Glass bottle, cleaning brush | Choose a clean, empty glass bottle which can hold sugar water for hummingbirds. Make sure to thoroughly clean the bottle with the brush. |
| 2 | Sugar, water, pot, spoon | Prepare the sugar water solution by mixing 1 part sugar with 4 parts water. Heat this solution in a pot until sugar completely dissolves, stirring occasionally. Let it cool down. |
| 3 | Feeding tube, rubber stopper | Purchase a feeding tube with a rubber stopper, which could fit the opening of the glass bottle. The feeding tube should have a flower-shaped tip to attract hummingbirds. |
| 4 | Wire, pliers | Cut a length of wire that will be long enough to wrap around the neck of the bottle and create a loop for hanging. Use pliers to bend and shape the wire as needed. |
| 5 | Sugar water solution, glass bottle, rubber stopper with feeding tube | Fill the glass bottle with the cooled sugar water solution. Insert the rubber stopper with the feeding tube into the opening of the bottle. Make sure it fits securely to prevent leaks. |
| 6 | Glass bottle, wire | Attach the wire to the neck of the glass bottle and create a loop for hanging. Make sure it’s securely wrapped and the bottle won’t fall. |
| 7 | Diy hummingbird feeder | Hang your DIY glass bottle hummingbird feeder in a shaded area near flowers or a place where hummingbirds are known to frequent. Check and refill the sugar water solution regularly to keep the hummingbirds coming back. |
Key Takeaway
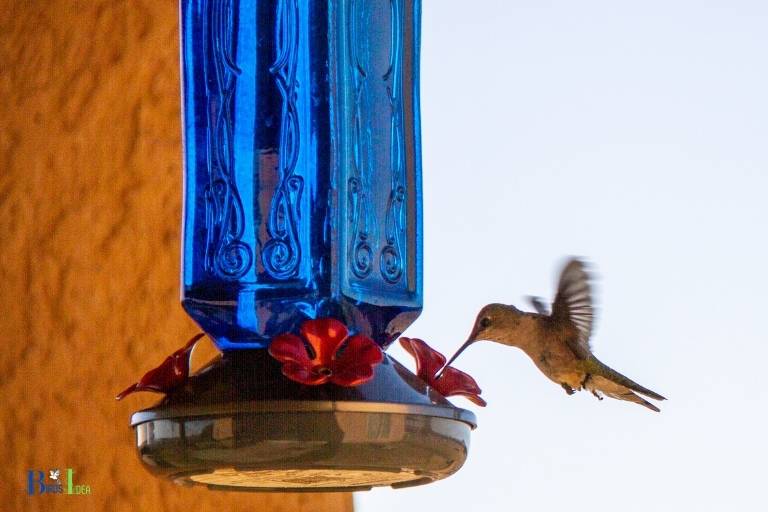
Five Facts About: Making a Hummingbird Feeder from a Glass Bottle
How to Make a DIY Hummingbird Feeder from a Glass Bottle?
Making a DIY hummingbird feeder from a glass bottle is an easy and cost-effective way to attract these small, colorful birds to your garden.
By repurposing a glass bottle and few other materials, you can create a simple yet functional feeder that hummingbirds will love.
- Clean a glass bottle thoroughly and remove any labels
- Choose a suitable cap or cork for the bottle with a hole in the center
- Insert a feeding tube, available at a garden or craft store, through the hole
- Attach a small, shallow dish or cup to the end of the feeding tube
- Fill the bottle with a homemade nectar solution (4 parts water to 1 part sugar)
- Hang the feeder in a shaded spot near flowers or shrubs, about 5 feet off the ground
Add red decorations to the feeder, as hummingbirds are attracted to the color red. Avoid the use of red dye in the nectar solution, as it can be harmful to the
“Hummingbirds are some of the most fascinating creatures in the animal kingdom, and creating a DIY feeder is a great way to invite them into your yard.”
birdsidea
What Supplies You Will Need to Make a DIY Hummingbird Feeder From a Glass Bottle?
To make a DIY hummingbird feeder from a glass bottle, you will need a few essential supplies to create an attractive and functional feeder.
These supplies are easy-to-find and can be repurposed from household items, ensuring a cost-effective and eco-friendly solution to attracting hummingbirds to your garden.
- Glass bottle: Choose a clean, empty bottle with a narrow neck, preferably colored red to attract hummingbirds.
- Feeding tube: Purchase a hummingbird feeder tube with a stopper and feeding tip.
- Hanging wire or string: Use a sturdy material like wire or twine to secure and hang the feeder.
- Hummingbird nectar: Prepare a sugar solution (1 part white sugar to 4 parts water) to fill the bottle.
- Decorative elements: Add red ribbons, beads, or flowers to enhance visibility for hummingbirds.
Remember, maintaining cleanliness and timely refilling the feeder is essential to keep your feathered visitors coming back.
Important Tips For Making a Hummingbird Feeder From a Glass Bottle
Creating a DIY hummingbird feeder using a glass bottle is an enjoyable and eco-friendly project to attract these delightful birds to your yard. By utilizing a few essential tips, your feeder will be both functional and visually appealing to hummingbirds.
Key tips for making a hummingbird feeder from a glass bottle:
- Select a suitable glass bottle with a narrow neck and a vibrant color, such as red or orange, to capture hummingbirds’ attention.
- Clean the bottle, making sure it is free from any residue.
- Purchase a feeder tube with a stopper, designed specifically for hummingbird feeders, to ensure an easy nectar flow.
- Prepare the nectar by combining four parts water with one part white sugar, then boiling and cooling the mixture.
- Securely hang the feeder in a shaded area near flowers or plants that hummingbirds frequent, providing them a comfortable environment.
By following these tips, your glass bottle hummingbird feeder will be a welcome addition to your garden and a delight for both you
Benefits of Making a DIY Hummingbird Feeder From a Glass Bottle
Making a DIY hummingbird feeder from a glass bottle offers numerous advantages for both bird enthusiasts and the environment.
By repurposing a glass bottle, you are reducing waste and promoting upcycling. Additionally, glass is a durable material that can withstand various weather conditions and is less likely to warp or fade compared to plastic alternatives.
Moreover, creating a homemade feeder allows you to customize the design, making it more attractive to hummingbirds and complementing your outdoor décor.
Lastly, a DIY hummingbird feeder is an affordable option, as it requires minimal investment in materials while providing a rewarding project.
- Environmentally friendly through upcycling and waste reduction
- Durable and long-lasting in various weather conditions
- Customizable design to attract hummingbirds and match outdoor décor
- Cost-effective and affordable
- Provides a rewarding and creative project
Troubleshooting DIY Hummingbird Feeders Made From Glass Bottles
Troubleshooting DIY hummingbird feeders made from glass bottles typically involves identifying and addressing common issues such as leakage, attracting pests, and maintaining cleanliness.
By understanding these, you can ensure a functional and efficient DIY glass bottle hummingbird feeder.
- Leakage: Inspect your feeder for cracks in the glass or loose seals in the bottle and hanger attachment. Ensure that the feeder is hung evenly and adjust if necessary.
- Attracting Pests: Use bee guards or narrow feeding ports to prevent access by bees and other insects. Avoid using yellow colors in your feeder design, as they can attract pests.
- Cleanliness: Regularly clean and sanitize your feeder to prevent mold growth and the spread of disease. Replace the nectar every 2-4 days or when it appears cloudy.
Adding a drop of red food coloring to the nectar can attract more hummingbirds without affecting their nutrition.
A single hummingbird can consume up to twice its body weight in nectar each day, making them important pollinators for many
birdsidea
How do you make a hummingbird feeder out of a 2 liter bottle?
To make a hummingbird feeder out of a 2 liter bottle, you will need some supplies and a few simple steps:
- 2 liter plastic bottle
- red spray paint
- scissors or box cutter
- hummingbird feeder tubes
- hot glue gun and glue sticks
- string or wire for hanging
Steps:
- Clean the plastic bottle and remove any labels or residue.
- Use the scissors or box cutter to cut a small hole near the bottom of the bottle. This will be where the hummingbirds access the nectar.
- Use the red spray paint to spray the bottle. Hummingbirds are attracted to the color red and it will help them find the feeder more easily.
- Once the paint has dried, use the hot glue gun to attach the hummingbird feeder tubes to the hole you cut in step 2.
- Fill the bottle with hummingbird nectar, which you can make at home or buy pre-made.
- Use the string or wire to hang the feeder outside in a spot that is easy for you to see and refill.
Remember to clean the feeder regularly (at least once a week) to prevent the growth of mold or bacteria.
How do you make a hummingbird feeder out of a Coke bottle?
To make a hummingbird feeder out of a Coke bottle, you will need a few household items and some patience. This DIY project can be a fun and easy way to attract hummingbirds to your yard.
Here are the steps involved in making a hummingbird feeder out of a Coke bottle:
- Cut a small feeding hole near the bottom of the bottle.
- Drill two small holes near the top of the bottle, opposite each other.
- Insert a wire through the holes and create a loop for hanging the bottle.
- Fill the bottle with sugar water and attach a hummingbird feeder feeding spout to the feeding hole.
- Hang the bottle outside and watch the hummingbirds come to feed.
With a little bit of creativity and patience, you can create a beautiful and functional hummingbird feeder using an old Coke bottle.
So start collecting those bottles and start making your own hummingbird feeder today!
What is the liquid mixture for hummingbird feeder?
If you’re making your own hummingbird feeder, you may be wondering what liquid mixture to use to attract the birds. Hummingbirds are attracted to the color red, so it’s best to use a red-colored liquid mixture.
Here’s a simple recipe for a homemade hummingbird nectar:
- Mix 1 part white granulated sugar with 4 parts water in a saucepan.
- Heat the mixture until the sugar completely dissolves.
- Allow the mixture to cool before pouring it into your hummingbird feeder.
It’s important to note that using honey, brown sugar, or artificial sweeteners in your mixture can be harmful to hummingbirds, so stick to white granulated sugar.
Also, avoid using food coloring, as it has no nutritional value for the birds and may even be harmful. With this simple liquid mixture, you’ll be sure to attract plenty of hummingbirds to your feeder.
Change the nectar in your feeder every few days, even if it hasn’t been fully consumed, to prevent bacteria growth and keep the nectar fresh for the birds.
What is the difference between glass and plastic hummingbird feeders?
Glass and plastic hummingbird feeders differ in a few ways. Here are some differences worth noting:
- Durability: Glass feeders are more fragile and prone to breaking if dropped or bumped. Plastic feeders, on the other hand, are more durable and less likely to break.
- Cleaning: Glass feeders are easier to clean due to their smooth surface and lack of scratches that can harbor mold and bacteria. Plastic feeders, however, can have scratches that make cleaning more challenging.
- Sun Damage: Glass can magnify sunlight and potentially overheat the nectar, which can be harmful to hummingbirds. Plastic feeders, however, are more resistant to sun damage.
If you’re making a DIY hummingbird feeder with a glass bottle, keep in mind that you will need to take extra care when handling and cleaning it.
Alternatively, you can use a plastic bottle if you want a feeder that is more durable and easier to clean.
FAQ for DIY Hummingbird Feeder Glass Bottle
What materials do I need to make a DIY hummingbird feeder glass bottle?
How do I prepare the glass bottle for the feeder?
Where can I find a suitable glass bottle for the hummingbird feeder?
What is the ideal sugar-water ratio for the hummingbirds?
Conclusion
In conclusion, making a DIY hummingbird feeder from a glass bottle is a simple and enjoyable project that requires just a few supplies and some basic crafting skills.
By following the step-by-step instructions and important tips provided, you can create a beautiful and functional feeder that will attract these delightful birds to your yard.
The benefits of making your own hummingbird feeder include cost savings and the opportunity to upcycle a glass bottle into something useful.
However, it is important to troubleshoot any issues you may encounter with your feeder, such as leaking or bee invasion, to ensure the safety and well-being of the birds. Give it a try and enjoy watching the hummingbirds come to visit!

