Hand Held Hummingbird Feeder DIY: A Guide
Handheld hummingbird feeders are a convenient and enjoyable way to attract hummingbirds to your outdoor space, allowing you to get an up-close look at these beautiful creatures.
With a few simple materials and steps, you can easily create a DIY handheld hummingbird feeder to elevate your birdwatching experience.
Securely hold the feeder or place it on a stable surface, and wait for the hummingbirds to visit.
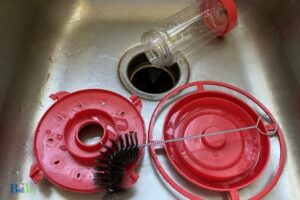
Ensure to clean the feeder regularly and change the sugar-water solution to maintain a healthy and inviting environment for the birds
9 Material for Hand Held Hummingbird Feeder DIY
| Material | Description | Quantity | Additional Information |
|---|---|---|---|
| Plastic Bottle | Clear, with a tight lid | 1 | Preferably 8 to 16 oz capacity |
| Bottle Lid | To fit the plastic bottle | 1 | – |
| Red Marker | Non-toxic, waterproof | 1 | To attract hummingbirds |
| Sugar | White, granulated | 1 cup | For making nectar |
| Water | Clean, filtered | 4 cups | For making nectar |
| Small Plastic Cup | Red, with small lid | 1 | To hold nectar |
| Cotton String | Strong, thin | 2 ft | To hang the feeder |
| Scissors | Sharp | 1 | To cut holes in the bottle and cup |
| Glue | Waterproof, non-toxic | 1 | To attach cup to the bottle lid |
Key Takeaway
Five Facts About: Hand Held Hummingbird Feeder
How to Create a Handheld Hummingbird Feeder?
Creating a handheld hummingbird feeder is a fun and easy DIY project that allows you to enjoy the beauty of hummingbirds up close.
To make your own feeder, gather a small plastic container with a lid, red-colored plastic flowers, a string or ribbon, a small drill, and a needle.
- Drill small holes in the container lid, and insert the flower stems through the holes.
- Fill the container with sugar water (1 part sugar, four parts water).
- Secure the container lid tightly, ensuring no leaks.
- Tie a string or ribbon around the container to create a handle.
- Hold the feeder outside, and wait for hummingbirds to visit.
To attract hummingbirds, choose bright red flowers and place the feeder near plants that hummingbirds naturally visit.
Remember to clean your feeder regularly to maintain hygiene and replace the sugar water every few days to prevent fermentation.
“Hummingbirds are not just beautiful creatures, but also essential pollinators for many plants.”
birdsidea
Essential Materials Needed for DIY Handheld Hummingbird Feeder
To create a DIY handheld hummingbird feeder, you’ll need a few essential materials to ensure a sturdy and functional design that attracts these tiny birds.
Gather the following items before you start the project:
- Small plastic container with lid (e.g., baby food jar)
- Red ribbon or colored tape
- Clear plastic spoon or syringe
- Sugary nectar mixture (1 part sugar, 4 parts water)
- Scissors
- Drill or small awl
- Optional: small beads, stickers, or decorations
Begin by preparing the sugary nectar mixture, which will serve as the food source for the hummingbirds. Then, drill or puncture small holes in the plastic container lid, attach the red ribbon or tape to the container, and fill it with the nectar.
Attach a clear plastic spoon or syringe to the lid to act as a feeding spout. Add any optional decorations to make the feeder visually appealing and comfortable to hold.
Finally, situate yourself near a known hummingbird area with your DIY handheld hummingbird feeder and enjoy close encounters with these fascinating creatures.
Step-by-Step Instructions for Making a Handheld Hummingbird Feeder
Making a handheld hummingbird feeder is a fun and rewarding experience that allows you to get up close while providing nourishment for these fascinating birds.
Here’s a step-by-step guide on creating your own feeder:
Gather materials: a plastic bottle with a lid, a small plastic container (like a bottle cap), red ribbon, non-toxic waterproof paint (optional), and sugar water solution.
Create a feeding port: Drill a small hole (1/8″ in diameter) in the center of the bottle lid.
Attach the container: Glue the small plastic container to the underside of the lid, surrounding the hole.
Decorate the feeder: If desired, paint the feeder with non-toxic paint to make it more visually appealing to hummingbirds.
Prepare sugar water: Mix 1 part sugar to 4 parts water, stirring until dissolved.
Fill the feeder: Pour the sugar water solution into the plastic bottle and attach the lid.
Add visual cues: Tie the red ribbon around the neck of the bottle to attract hummingbirds.
Hold the feeder: Grasp the bottle’s bottom and carefully approach an area frequented by hummingbirds.
Tips for Improving the Performance of a Handheld Hummingbird Feeder
Improving the performance of a handheld hummingbird feeder is crucial to attract more birds and make your DIY project successful. There are various tips that can enhance the functionality of your feeder, ensuring hummingbirds feel comfortable and safe while feeding.
- Choose the right location: Place the feeder in a spot with partial shade, away from high-traffic areas and potential predators.
- Use the right sugar solution: Prepare a 4:1 water to sugar solution, as it closely resembles natural nectar. Avoid using honey, artificial sweeteners or red dye.
- Keep it clean and fresh: Replace the nectar every 2-3 days and clean the feeder thoroughly to prevent mold and bacteria growth.
Creative Ideas for Decorating a Handheld Hummingbird Feeder
Decorating a handheld hummingbird feeder can be a fun and creative way to attract these delightful creatures while adding a personal touch to your outdoor space.
Here are five creative ideas to consider:
Painted Glass: Use non-toxic, weather-resistant paint to create colorful patterns and designs on the feeder’s glass reservoir. Ensure the paint does not block the feeding ports.
Beaded Accents: Attach vibrant beads or crystals to the feeder’s chain or outer structure for a dazzling appearance that captures the sunlight.
Floral Arrangements: Embellish the feeder with artificial flowers, mimicking the natural environment hummingbirds are attracted to; make sure they do not obstruct the feeding ports.
Whimsical Figurines: Secure small, lightweight garden figurines like fairies, butterflies, or other charming creatures around the feeder to enhance its visual appeal.
Themed Designs: Customize your feeder according to a specific theme, such as a favored color palette or a seasonal motif like autumn leaves or snowflakes.
Remember to always prioritize the safety and comfort of the hummingbirds while decorating your feeder. Avoid using any materials that may be toxic, sharp, or overly fragrant.
Common Mistakes to Avoid When Making a Handheld Hummingbird Feeder
Making a handheld hummingbird feeder can be a fun and rewarding DIY project, but it’s essential to avoid some common mistakes to ensure a positive experience for both you and the hummingbirds.
- Using the wrong materials: Opt for food-safe and non-toxic materials to prevent contamination or harm to the birds.
- Incorrect sugar-water ratio: Maintain a 4:1 ratio of water to sugar, as higher sugar concentrations can harm the hummingbirds’ health.
- Not changing the nectar regularly: Replace the sugar-water mixture every 2-3 days to prevent fermentation and bacterial growth.
- Skimping on cleaning: Clean the feeder thoroughly and regularly to avoid mold and dirt buildup.
- Ignoring the surroundings: Place your handheld feeder in a quiet, sheltered spot for the birds to feel secure while feeding.
- Forgetting about predators: Keep the feeding area free of potential predators, such as cats or larger birds, to ensure the hummingbirds’ safety.
By avoiding these common mistakes, you can create a safe and enjoyable handheld hummingbird feeder that brings these delightful creatures closer to you and supports their well-being.
Conclusion
In conclusion, creating a handheld hummingbird feeder is a fun and rewarding DIY project that can provide hours of entertainment as you watch these beautiful birds come and feed at your fingertips.
With just a few essential materials and some simple instructions, you can create a feeder that is both functional and decorative.
Remember to avoid common mistakes and follow tips for improving performance, such as using bright colors and placing the feeder in a safe location.
Get creative with your decorations and enjoy the beauty of nature up close with your homemade handheld hummingbird feeder.
According to a study, a hummingbird’s heart rate can reach up to 1,260 beats per minute, and they can flap their wings up to 80 times per second!
birdsidea
FAQ for Hand Held Hummingbird Feeder DIY
What materials are needed to make a hand held hummingbird feeder?
What type of sugar should I use to make hummingbird feeder nectar?
Are there any safety tips I should follow when making a hand held hummingbird feeder?
How do you make a hand held hummingbird feeder?
To make a hand held hummingbird feeder, follow these steps:
- Gather materials such as small glass bottles with lids, copper wire, pliers, and a hummingbird feeder tube.
- Wrap the copper wire around the cap of the bottle and form a loop at the end to hang the feeder.
- Attach the hummingbird feeder tube to the opening of the bottle.
- Fill the bottle with hummingbird nectar and secure the lid.
- Hang the feeder in a place where hummingbirds can easily spot it.
- Plant native flowers such as salvia and bee balm to attract hummingbirds.
- Hang multiple feeders in different locations around your yard.
- Change the nectar every few days to ensure freshness and discourage bacterial growth.
How can I make a homemade hummingbird feeder?
Hummingbirds are fascinating and beautiful birds that require nectar as a food source. Making a homemade hummingbird feeder is a great way to attract hummingbirds to your garden and observe them up close.
Here are the steps to make a hand-held hummingbird feeder:
- Gather the supplies small glass bottle, cork, copper tube or wire, pliers, and red paint.
- Use pliers to bend the copper tube at a 90-degree angle, leaving a small loop at the top for hanging.
- Paint the bottle red to attract hummingbirds and let it dry.
- Drill a small hole in the cork and insert the copper tube through it.
- Insert the cork into the bottle and fill it with a homemade nectar solution (mix four parts water with one part sugar).
- Hang the feeder and enjoy watching the hummingbirds feast.
Keep the feeder clean and refill it with fresh nectar every few days to keep the hummingbirds coming back.
How do you make a cheap hummingbird feeder?
To make a cheap hummingbird feeder, follow these simple steps:
Find a plastic bottle: Look around your house for old plastic bottles. You can also get one from a recycle bin.
Drill holes: Using a small drill bit, make two holes at the top of the bottle and one at the bottom.
Make a feeding station: Insert a plastic flower or a piece of sponge into each hole at the top.
Fill the bottle: Mix a solution of four parts water and one part sugar. Pour it into the bottle.
Hang the feeder: Tie a string around the neck of the bottle and hang it in a tree or any place you think hummingbirds can locate.
By following these simple steps, you can create a cheap homemade hummingbird feeder that will attract these beautiful creatures to your backyard.
What is best for hummingbird feeder?
If you want to attract hummingbirds to your garden, a quality and well-maintained hummingbird feeder is essential. However, choosing the best hummingbird feeder can be a daunting process given the numerous designs and models available in the market.
Here are some factors to consider when selecting the best hummingbird feeder:
- Capacity: Choose a feeder that can hold sufficient nectar to minimize frequent refills.
- Material: Select a feeder made of sturdy materials that can withstand the elements and regular use.
- Ease of cleaning: Go for a model with easily removable parts for effortless cleaning and refilling.
- Ant protection: Choose a feeder with ant guards and bee guards to prevent them from accessing the nectar.
- Perch or no perch: Decide whether you want a feeder with perches or one that doesn’t have any perches.
Regularly clean and refill your hummingbird feeder, avoid using pesticides near the feeder, and change the nectar every few days to prevent spoilage.
What is the best material for a hummingbird house?
When creating a hummingbird house, it’s essential to choose the right materials to ensure their safety and comfort.
Here are some options to consider:
- Wood: Cedar or redwood are good choices because they are durable and resist weather damage.
- Plastic: Durable plastic can withstand extreme weather conditions.
- Glass: Glass hummingbird houses can provide a stylish look and are easy to clean.
- Gourds: Dried gourds can provide a natural look, and hummingbirds love them.
- Metal: Painted metal can resist rust, making it a good choice for outdoor use.
No matter what material you use, be sure to choose a design that allows for easy cleaning to maintain a hygienic environment for the hummingbirds.
Are glass or plastic hummingbird feeders best?
Hummingbird feeders come in different materials, shapes, and sizes, which can make choosing the right one overwhelming, especially for beginners.
Here are some key points to help make the decision easier:
- Glass feeders are durable, long-lasting, and usually easier to clean.
- Plastic feeders are more affordable and can be found in a wider variety of shapes and sizes.
Keep in mind that no matter what material you choose, the most important factor in attracting hummingbirds is filling the feeder with fresh nectar regularly.
Whatever feeder you choose, make sure to keep it clean and free of mold and bacteria. With these considerations in mind, it ultimately comes down to personal preference and budget.
What color is best for hummingbirds?
Hummingbirds are attracted to bright colors, particularly shades of red, orange, and pink. These colors mimic the flowers that hummingbirds typically feed on in the wild.
However, different species of hummingbirds may have slightly different preferences, and some may also be attracted to shades of yellow or purple.
Keep in mind that it’s not just the color of the feeder that matters, but also the nectar inside. Make sure to use a nectar solution that is free of dyes and additives, as these can be harmful to the birds.
Additionally, it’s important to regularly clean your feeder to prevent the growth of mold and bacteria.

